Bored at home? Here’s an easy, inexpensive way to learn some forensics by dusting for fingerprints.
In this post, I’ll tell you about making your own fingerprint powder, what brushes you’ll need, other small inexpensive supplies, and how to “lift” the fingerprints off the objects you’ve processed. Better yet, I’ve included a fingerprint chart so you can determine what fingerprint patterns you have. If you get your friends and extended family involved, you can even take a picture of the fingerprints you’ve found and e-mail or text the photos to them to compare and see if you have similar fingerprint patterns.

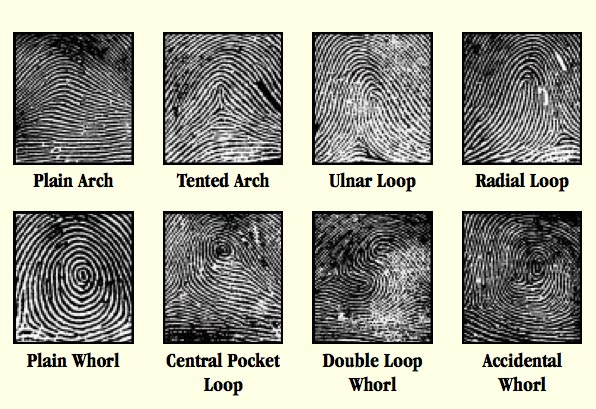
Fingerprints are one of the most important types of trace evidence found at a crime scene, because no two persons, even identical twins, have the same exact fingerprints. They are what is called a “positive means of identification.” I’ve included a fingerprint chart at the end of this lab so you can determine what types of fingerprint patterns you have. There are eight standard types of fingerprint patterns, and it is extremely rare for a person to have the same fingerprint pattern on all ten fingers.
Even though a person may have the same fingerprint pattern as another person, there are many more characteristics needed to match up the fingerprint. These unique characteristics are called “points of comparison” and will be covered in another post. Some of the unique points of comparison are called ridge endings, bifurcations, island, short ridge, dot, enclosure, double bifurcation, and bridge. For a fingerprint to match a suspect to a fingerprint found at a crime scene, it is generally agreed that there must be at least 10 of the exact same points of comparison that match up in the same position.
A fingerprint is made up of over 95 percent water, with the rest being oils, amino and fatty acids, and salt. The concept of finding fingerprints using fingerprint powder is to have the powder adhere to the fingerprint ridges that the finger has exuded these oils, acids, salt and water, so the fingerprint becomes visible. Your body exudes these oils and fatty acids through the pores of your skin, so the more fatty and oily food in your diet, the more you’ll pass through your pores.

Some fingerprints can easily be seen without using any fingerprint powder. These are called “patent” (pronounced pay-tent) fingerprints. An example of patent fingerprints would be if you were to press your finger on a mirror. You would see your fingerprints without using any powder. When processing a crime scene for fingerprints that cannot be seen, these fingerprints are called ‘latent’ or hidden prints, as only fingerprint powder will allow them to be visible. This is usually due to the condition of the object the fingerprint is left on. In cases where latent prints are left by a suspect, the crime scene investigator must be thoughtful and imaginative on where he or she thinks the suspect touched during the crime, and where to use the fingerprint powder. They must know where to look and process for what they can’t yet see, but hope to discover.
In this post you’ll learn:
How to make your own fingerprint powder
What type of fingerprint brushes to use
How to process objects using the powder and brush
How to photograph the fingerprints you find
How to remove or “lift” the fingerprints from the objects
How to save these fingerprints so they can be submitted to a forensic laboratory.

What you’ll need:
Cornstarch (baby powder that is pure cornstarch is fine too)
Powdered graphite (sold in hardware section) OR powdered cocoa OR wood pencils
Sandpaper, 80 grit or lower (only if you are using pencils)
Clear tape, such as Scotch tape or packaging tape
Plain index cards
Make up brush or 1 inch wide paintbrush (unused)
Magnifying glass
Small mirror, drinking glass, bottle, or can (light colors since we are making dark powder)
Clean container or jar to store the powder

Making the fingerprint powder
We’ll make our own fingerprint powder. Fingerprint powder that is already made and sold through forensic equipment suppliers is made up of pretty nasty chemicals, such as in the case of black fingerprint powder: rosin, black ferric oxide and lampblack. Some also contain inorganic chemicals such as lead, mercury, cadmium, copper, silicon, titanium and bismuth. These chemicals require the crime scene investigator using them to wear facial protection to avoid ingesting or inhaling the fine particles of powder. You may choose to wear some facial protection to keep your home-made powder out of your nasal passages.
Crime scene investigators use many different types and colors of fingerprint powder, depending on the color and material of the object they are going to dust. If the object they are going to dust is very light in color, they will use a dark fingerprint powder; the reverse if the object to be dusted is dark, then a light powder will be used. The color of the fingerprint powder must always be in contrast to the object dusted.

If you are using powdered graphite powder or cocoa, mix an equal part of the powder to the cornstarch, using a measuring spoon or cup. Once mixed together thoroughly, put the powder in a clean container or jar with a tight-fitting lid. Very little powder is needed, so you can start out with just a tablespoon or so, but if you want to make more, it will stay just fine in your container for future use. Keep the lid on to avoid the powder getting wet or humid, because it will then become like a paste and unusable.
If you do not have powdered graphite or cocoa, simply rub a sharpened pencil against the sandpaper until the graphite comes off the pencil, then carefully pour the graphite powder into a clean container or jar with a tight-fitting lid. Keep sharpening the pencil so you can keep producing the graphite. No sandpaper: try a brick or other rough hard object, like a rock. When you think you have enough graphite, add an equal amount of cornstarch to the graphite powder, and mix thoroughly. Very little powder is needed for this lab; it is suggested that no more than one tablespoon total be produced, however, if you want to make more, it will stay just fine in your container for future use. the key is equal amounts of graphite to powder.
Dusting for fingerprints
Now that you have the fingerprint powder, we’re ready to start. Just remember that whatever you put the powder on will be hard to clean afterwards, so choose items you are willing to either spend some time scrubbing when you are done, or that you are willing to throw away.
Step 1. Take the objects you want to fingerprint and then, rubbing your fingers on your forehead and the bridge of your nose to get your fingers coated with water and oils, place your fingerprints on the objects (these are the best places on your body for water and oils). You do not have to press hard to leave a fingerprint, just handle them as if you were normally touching them.
Step 2. Dip the end of your brush lightly into the fingerprint powder in your container.

Step 3. Lightly brush the objects in a circular motion until you see your fingerprints appear. A circular motion is important, because fingerprints are circular and you must not brush across the ridges, otherwise they will smear.
Step 4. Using a cellphone, take a close up photo of the fingerprints, making sure the image is not blurred.
Step. 5 Take a small piece of Scotch tape or packaging tape, no longer than four inches, and fold over the edge about an inch. This will give you a way to remove the tape without it ripping and destroying your fingerprint. Now cover each fingerprint with the tape, being careful to smooth out the tape and avoid bubbles. Run your finger over the tape to make sure it has good contact with the fingerprint powder.
Step 6. Using the folded over edge, very slowly lift the fingerprint and place the tape immediately onto a clear index card. Smooth the tape onto the card. Fingerprints are lifted and placed on cards for submittal to a lab for comparison to a suspect, because the actual object itself is not accepted at a lab; only pictures or lifts.
Step 7. On the back of each card, write what object you lifted the fingerprint from. This will help you remember which fingerprints were lifted from which objects. If you are doing this with other people at home, they should write their name on the card so you can tell each person’s apart.
Identifying your fingerprint patterns
Using the chart below, compare your fingerprints and see if you can determine what type of fingerprints you have. See how many different patterns you can find. You can also have other members of your family put their fingerprints on objects, and repeating the steps, see if you can find their fingerprints and compare patterns. No two fingerprints are alike; not just between brother, sister or parents, but even on the same person.

Try this outside too on your house doors and windows, cars, anywhere there is a hard, smooth non-porous surface. In the world of a real crime scene investigator that is dusting for fingerprints, they will have powder of many different colors to use. That is because the powder must always be the opposite color of the item being processed so it is easier to see the fingerprints. For example, they would not use white powder looking for fingerprints on a white bathtub; they would choose either black, grey, red or orange.
I’ll be posting additional at-home forensic techniques in the future.
Enjoy and good luck!